Today there is some maintenance scheduled on the server where the scenerydesign.org website runs on, so this could result in a little downtime somewhere during the day. So if you have trouble reaching the site later today, just try again after a while.
Sneak preview: interactive attached object placement
Yesterday I started to work on a feature that has been on the wishlist for quite a while. I am not fully done yet, but since the results are quite nice already I want to share this preview video. In this video you see an interactive mode to place and orientate an attached object (in this case a light). With this new mode you can just click on the object where you want to light to be and then press on the ground or object to specify the direction it should shine.
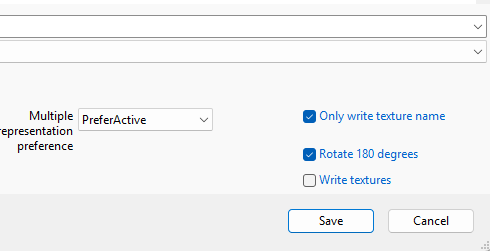
Write textures on export
I have added a new feature to ModelConverterX. On export of objects and scenery you can now also write the textures that are used on the object. This function can be enabled with the options that available in dialog where you select the location to export to. Below you see the section of the dialog with the “Write textures” option.
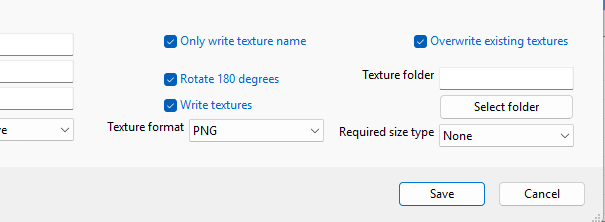
Once you select this option, additional settings appear (see screenshot below) where you can select how the textures should be written. For example which format is used, if existing textures are overwritten and also to which folder. One small note, when exporting as MSFS scenery package the option to select the folder is not available, since the texture folder has a fixed location in the package sources, so that is determined automatically for you.
Improved livery support (or should I say MSFS VFS support)
In the latest development release of ModelConverterX I have made a number of changes so that MSFS livery packages can now also be read correctly and show the textures as they should. Often these packages depend on their base package for some of the texture or part of the model. In the texture.cfg or model.cfg file there are relative paths to the base package in that case.
Before ModelConverterX could not resolve these relative paths correctly, because they are in the Virtual File System (VFS) that MSFS uses to “deploy” the packages to. So that means that on disk the folder structure is different in your Offical or Community folder. ModelConverterX does now build up a representation of the MSFS VFS in memory, so that it can use that to resolve those relative paths and find the correct folder for them on your disk.
Of course this does not only affect aircraft livery packages. It turned out that also when loading airport or other scenery packages the references to the base of modellib texture folders are resolved a lot better. So also for such object you should get less (or hopefully no) warning of missing textures.
I did also modify the default search path for the texture, since some entries I added in the past were no longer needed now that the MSFS VFS is supported correctly. So I recommend all users to revert the texture search path to the default values to get optimal results.
Import MSFS developer project XML
ModelConverterX is able to export MSFS scenery packages for quite a while already. To do this a MSFS dev project is written and then compiled with the fspackagetool. But when I implemented this feature, it never occurred to me that the reverse would be useful as well. Until a few weeks ago when I tried to help a developer tweak his MSFS project. I realized it was not that easy with MCX to modify an object in the project, while keeping the placement intact.
So in the latest development release I have added an import function for the MSFS developer project XML file as well. MCX will then read the ModelLib, BGL and SimObject assets that are defined in that project into its memory so that you manipulate them or export them to other formats.
To read ModelLib assets ModelConverterX uses the MSFS model XML reader that was already present. To read the BGL assets the XML reader is used and to read the SimObject assets the CFG reader is used to read the aircraft.cfg or sim.cfg file.
While adding this feature I also found a few minor bugs in the CFG reader, so I have fixed them directly as well.
Oops, a bug…
In the latest development release of ModelConverterX I have fixed a bug with the export of the metallic, roughness and AO texture (the comp texture) to MSFS models. That there are bugs in my tools now and then is something I am used to (bug free software is hard to find). But for this bug I was a bit shocked that it has been in ModelConverterX for about 9 months and it only got reported to me by two users in the last few weeks. And with the bug present the comp texture in glTF models would not work in MSFS at all.
I introduced this bug while adding support for MSFS 2024 materials at the end of last year. But to be honest I am still not really a MSFS guy. The way of working of FS2004 and FSX is still more in my system. So personally I don’t really notice if the materials are working right, I more look at them from the coding point of view (glTF file format, OpenGL shaders to render them). I would not even know how to make a comp texture from scratch myself.
And the fact that MSFS takes so long to just startup and test a simple object (something that takes very little time in FSX), also means that personally I don’t really enjoy if I have to test something in that sim. I really miss the old SDK tools that you can just run from the command prompt, instead of having to fire up the whole simulator to just compile a project. And then I don’t even mention the fact that each time I start up MSFS I first have to download a few GB of updates before it will run.
Sorry for ranting a bit about MSFS here :). Let’s summarize this post by saying that I am very happy to get feedback from developers who are more into MSFS on things that are broken or could be improved in my tools. I’m sure that together we can fix them and maybe one day I will get more used to the MSFS way of doing things…
Changes to options
In the latest development release of ModelConverterX the way you can specify the different options has changed. Before all options were in one options form, but now they have moved closer to where you need them. That means that the options related to importing or exporting are now found in the same dialog where you specify which file should be imported or exported. And also the dialog will only show the options that are relevant for the format you are working with.
The video tutorial below gives a quick demonstration of where you can find the different options now. I hope you like it!
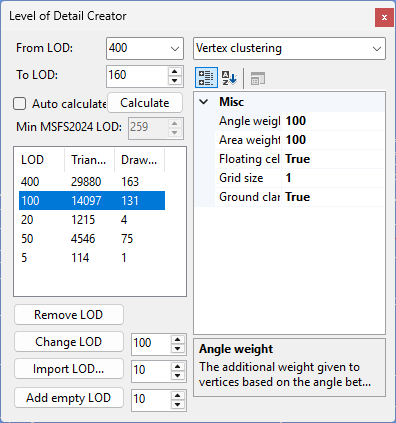
Minimum MSFS LOD values
In MSFS 2024 the level of detail (LOD) system has been changed. As specified in the SDK, based on the number of vertices in the level of detail representation there is a minimum minimum size value that is allowed in MSFS 2024. This means that objects with a certain amount of vertices will disappear at a certain distance and if there is no level of detail representation below it.
In ModelConverterX I have now implemented a number of changes that will help you to work with this new system more efficiently. It should be noted that ModelConverterX does show the FSX/P3D LOD values in the different forms and not the minimum size value that MSFS uses. On export to MSFS formats this is automatically converted.
- The glTF writer has an option now called “Limit MinSize based on vertex count”, when enabled (which is the default value) this logic will modify the LOD value of the object to match with the table of the SDK based on the number of vertices in the object.
- In the LOD Creator form you can now see what the minimum LOD size is that MSFS 2024 supports based on the complexity of the object. So that helps you to select the best value and also gives an indication when you would need to add additional LOD. In the screenshot below you see an object that has LOD 100 in FSX, but given the 14097 vertices in the LOD MSFS 2024 would allow a LOD value of 239 as minimum value.
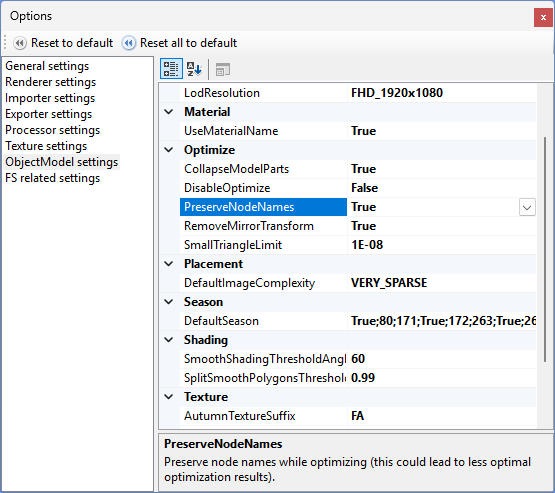
Preserve node names
After importing an object ModelConverterX does optimise the scenegraph, the structure of all the nodes in the object, as you can see in the hierarchy editor. During this process the node names that ModelConverterX can read from certain file formats were often lost. After multiple requests from users that they would like to keep those names, for example because it make it easier to edit the MSFS model XML or to find a specific node, I have now modified the optimisation logic so that it will preserve those names.
By default the logic to preserve the node names is off, since it can result in a less optimal model structure and thus more drawcalls. But you enable it in the ObjectModel settings in the Options form. Just set the value PreserveNodeNames to true.
ASToFra libraries for developers
The libraries that are used in my tools, like ModelConverterX and scenProc, are called the ASToFra libraries. Which standards for Arno’s Scenery Tool Framework. Other developers are sometimes using these libraries in their (freeware) tools as well, for example to have a 3D preview of Flight Simulator objects.
Until now these developers needed to pull the libraries from a ModelConverterX development release, but I have now changed this. From now you can pull the libraries from the SceneryDesign.org NuGet feed and that way get the libraries and their dependencies into your tool.
There were some samples available as a ZIP file on how to use these libraries, I have put these in a public Gitlab project now. This project also contains the reference to the SceneryDesign.org NuGet feed mentioned above. So this would be a good starting point for developers:
https://gitlab.com/scenerydesign.org/astofra-developer-examples